Source: Organic Gardener
By Perrie Layton
The larva of a species of tiger moth (Pyrrharctia isabella), the woolly bear caterpillar is also known as a woolly worm. They average about 1 1⁄2 inches long, and are bristly, with black stripes at each end and a reddish brown stripe in the middle. They curl into a ball when touched
Popular folklore claims that the length of the center stripe on a woolly bear predicts the upcoming winter weather. If the black stripes on each end are longer than the middle stripe, the winter will be harsh. A wide center stripe means the winter will be mild. The accuracy rate of the caterpillars, however, has been difficult for scientists to determine. Among a group of woolly bears, the stripes can vary greatly, making their forecast difficult to confirm. Perhaps, like TV weathermen, some caterpillars are correct and some are not.
They eat mostly weeds, including dandelion, clover, and grasses, and generally will not harm your ornamentals or vegetables.
In fall, woolly bears cross roads or paths searching for protected places to overwinter. In spring, they resume eating until pupating in a cocoon made from silk and their own hair. Adult moths emerge in two weeks.Woolly bears are the Dale Earnhardts of the caterpillar world, crawling at a neck-snapping .05 miles an hour, or about a mile a day.
The woolly bear is celebrated with a festival each October in Vermilion, Ohio. Folks in Banner Elk, North Carolina, celebrate the upcoming ski season with an annual Woolly Worm Festival and Race.
Thursday, October 6, 2011
Predicting Frost
Source: Organic Gardener
By Eliot Tozer
As a former Navy pilot who studied how to predict the weather and an experienced gardener, I've learned that a few easily observed atmospheric conditions and the lay of your land will tell you exactly when the first frost will hit your garden. With this information you can plan to protect some plants and get others ready for the compost pile.
Clouds
If the sky is clear, the air is dry, and the temperature is falling, chances are frost will settle on your garden. But if the sky is cloudy, frost is less likely, because low, thick clouds act like a blanket. They prevent the heat that Earth radiates at night from escaping into the atmosphere, keeping frost from settling on your plants.
Breezes
During the day, Earth absorbs heat from the sun. At night, it radiates that heat back into the atmosphere, and cold air gradually settles around your plants. But a slight breeze mixes the somewhat warmer air from above with the cold air near the soil. So frost is less likely on a night with a gentle breeze (but not strong wind) blowing.
Frost Pocket
Cold air is dense. The molecules are packed tightly together, and the air is heavy. It is so heavy that it flows downhill and, like water, pools in low places. The temperature in a valley may be as much as 18° lower than the temperature on the adjoining slope. Likewise, the temperature in your garden varies from a point on a sunny slope near a wall to the hollow in the bottom of your garden. However, trees on a slope will warm the draining air as it passes through because trees transpire, or give off moisture, reducing the likelihood of frost even in the hollow.
Southern Slope
A gentle slope facing south receives solar radiation—heat and light—longer than other sites. And the radiation is more intense. That's why a southern slope is the best location for a garden. Also, cold air drains down slopes (as described in a "Frost Pocket"), so gardens on top of slopes will get frost later than those at the bottom or on level spots.
Trees
Trees act like a blanket that prevents ground heat from escaping into the atmosphere. They also exude moisture, raising the dew point. A vegetable garden surrounded on three sides by mature oaks will survive the first two or three frosts untouched—at least my vegetable garden does.
Walls
Cold air rushing down a slope collects not only in hollows (see "Frost Pocket") but also behind stone walls, fences, and rows of dense vegetation, such as hedges. Frost occurs sooner at the base of these barriers. To delay frost on plants growing beside a barrier, provide an opening in the wall or hedge through which the cold air can drain. On the other hand, a south-facing stone wall is a "heat sink." During the day the sun warms the stones, which release the heat at night, making the plants on the south side of the wall less prone to frost.
Dew Point
As the evening temperature falls, the air holds less and less moisture, until it condenses and dew forms. The temperature at which this happens is called the dew point. When dew forms, heat is released. That heat helps to keep the air temperature at or slightly below the dew point. So, the more moisture in the air at sunset, the less the likelihood that frost will occur during the night. (This is why commercial growers turn on sprinklers when frost is predicted. The added moisture in the air raises the dew point.)
Monday, June 20, 2011
2011 Seed Savors Exchange
The 2011 garden season is underway.
Here is a list of seeds that I ordered from Seed Savors Exchange:
605 - Bean, KY Wonder Pole , Packet 50 seeds
343 - Bean, Royalty Purple Pod , Packet 50 seeds
1468(OG*) - Soybean, Fiskeby OG, Packet 50 seeds
345 - Beet, Chioggia , Packet 100 seeds
349 - Broccoli, DeCicco , Packet 50 seeds
913 - Brussel Sprout, Long Island , Packet 50 seeds
357(OG*) - Carrot, Danvers OG, Packet 250 seeds
1304 - Eggplant, Rosa Bianca , Packet 50 seeds
625(OG*) - Kale, Red Russian OG, Packet 100 seeds
638 - Leek, Blue Solaiae, Packet 100 seeds
395(OG*) - Onion, Red Wethersfield OG, Packet 100 seeds
1432 - Pepper, Wis. Lakes , Packet 50 seeds
1299 - Pepper, Joe's Long , Packet 50 seeds
1216(OG*) - Pepper, Sweet Chocolate OG, Packet 25 seeds
1044 - Pepper, Orange Bell , Packet 50 seeds
1526 - Pepper, Jalapeno Traveler Strain, Packet 50 seeds
1213 - Pepper, Ancho Gigantea , Packet 50 seeds
46(OG*) - Chard, Five Color Silverbeet OG, Packet 100 seeds
259(OG*) - Tomato, Martino's Roma OG, Packet 25 seeds
310(OG*) - Sunflower, Rostov OG, Packet 100 seeds
132(OG*) - Sunflower, Velvet Queen OG, Packet 100 seeds
Wednesday, June 2, 2010
Growing Vertically
To make the most of a small garden plot, try growing your vegetables vertically with stakes or trellises. This year, we built trellises for the snap peas and pole beans.
What you need to make a simple, yet effective trellis:
4 - 1x2x8 pieces of lumber for the poles
4 - wood screws
2 packages of screw hooks (20 total)
String or twine (approximately 30 yards)
Level
Drill
Step 1: Arrange the screw hooks on two of the poles, spacing screw hooks 6-10 inches apart and alternating between poles.

Step 6: Starting at one end, string the twine through the hooks.


What you need to make a simple, yet effective trellis:
4 - 1x2x8 pieces of lumber for the poles
4 - wood screws
2 packages of screw hooks (20 total)
String or twine (approximately 30 yards)
Level
Drill
Step 1: Arrange the screw hooks on two of the poles, spacing screw hooks 6-10 inches apart and alternating between poles.

Step 2: Use the drill to start the holes for each screw hook.
Step 3: Screw the hooks into the poles until secure.
Step 4: Drive two poles into the ground with a hammer. Poles should be approximately 8 feet apart.
Step 5. Join the two vertical poles at the top and bottom by attaching a horizontal poles with wood screws. Use the level to get the pole level.Step 6: Starting at one end, string the twine through the hooks.
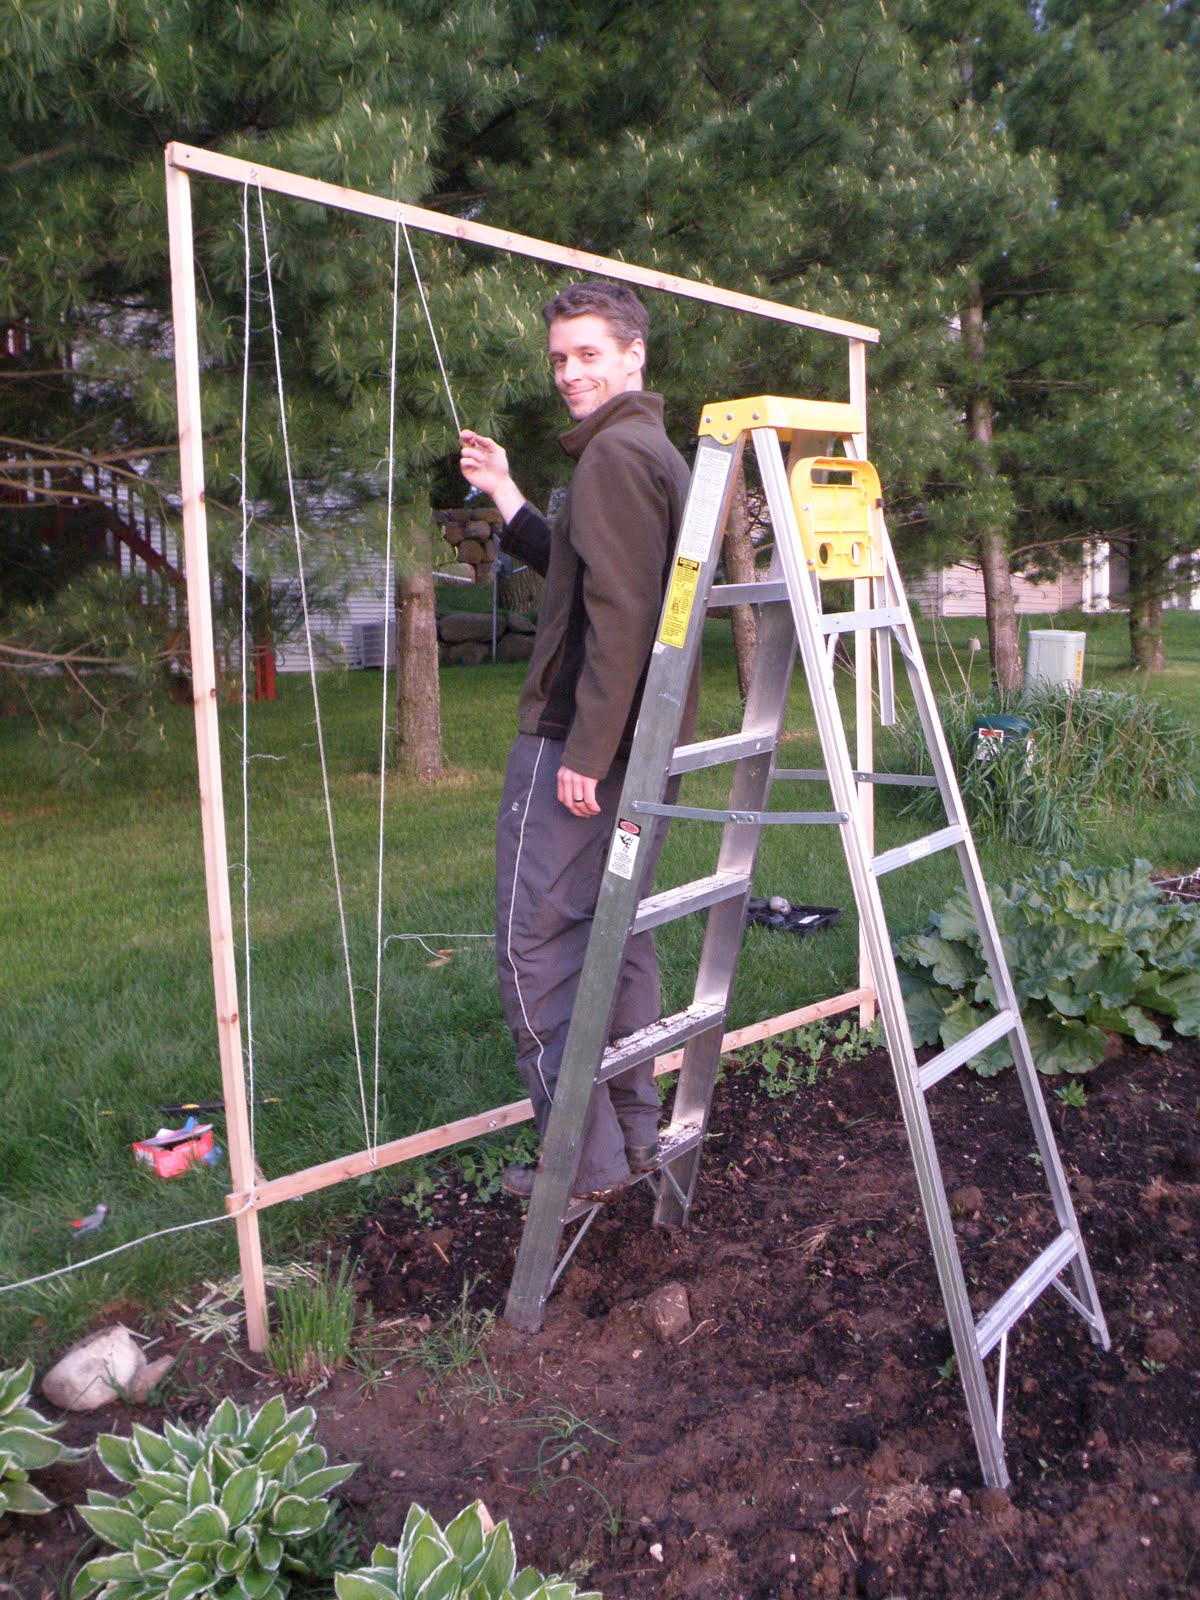
Alternate the twine between the top and bottom pole.

Step 7: Tie off the twine on other end.

Step 8: (optional) Use twist ties to support the plants until they are tall enough to climb the poles.

Step 9: Watch em grow!

Since peas are more of a cold weather crop, I build a trellis on the west side of the the peas for the pole beans. This is so that beans will help to shade the peas in the afternoon.

Wednesday, April 14, 2010
Square Foot Gardening
It's okay to be square!
Step 1: Loosen up the soil with a fork, shovel and/or rotor tiller. Add compost and fertilizer, if needed. (Thanks Katie & Dad!)

Step 2: Use a hammer to pound in wooden stakes on each corner.
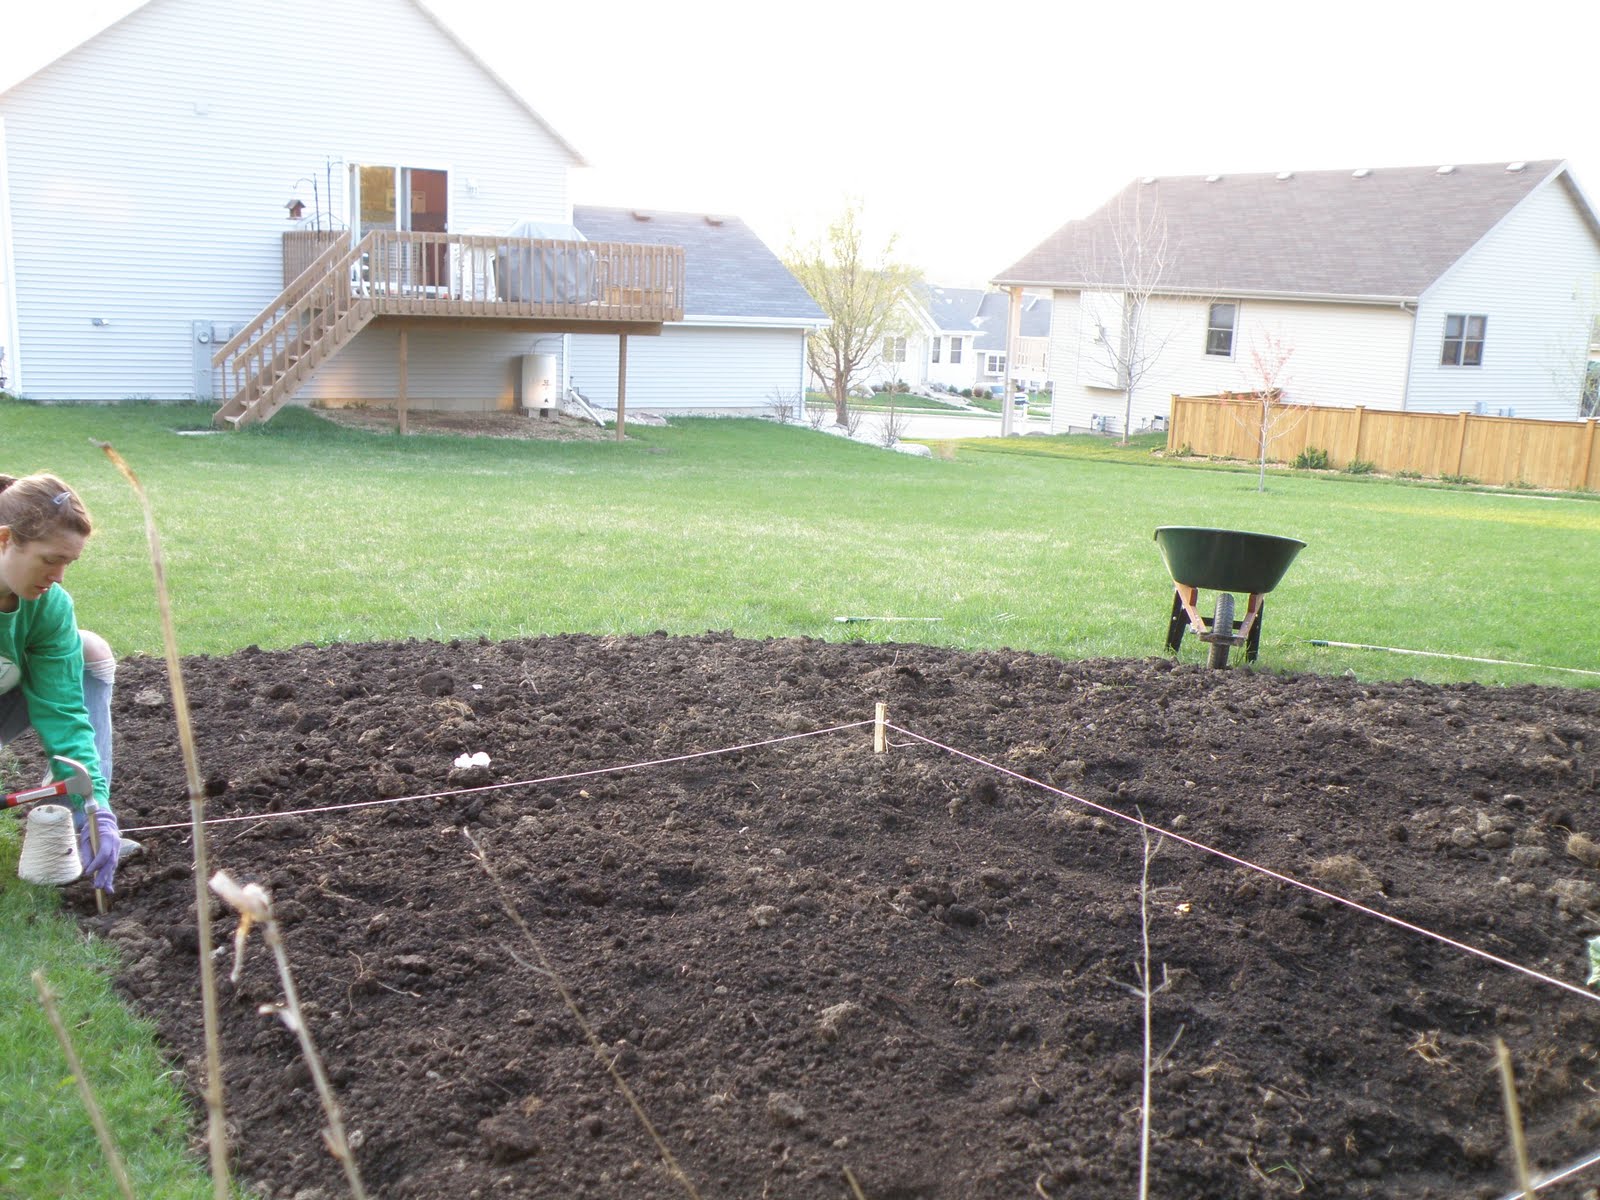
Step 3: Continue to outline your 1-foot grid with string and wooden stakes, starting with the four corners.

Step 4: Create approximately 6 rows, spaced about a foot or two apart in one direction.

Step 5: Complete the grid by adding rows in the opposite direction.

Step 6: Choose what to grow and plot where each veggie will go. Consider the following:
Sunlight: plant taller plants to the North so they do not shade the shorter plants.
Support: some plants like peas, cucumbers, and vine tomatoes will need a trellis. It’s best to put your trellis in a place where you can get to both sides of it, and where it won’t block your access to other plants.
Support: some plants like peas, cucumbers, and vine tomatoes will need a trellis. It’s best to put your trellis in a place where you can get to both sides of it, and where it won’t block your access to other plants.
Companions: Look up your vegetable using the Companion Planting Tool and make sure it’s “neighbors” are compatible.
Competing spaces: don’t plant vegetables next to each other that will be competing for the same space. For example, potatoes try to spread all over (or under!) so don’t put them next to onions or carrots.


Step 7: Follow the planting instructions on the seed package, planting seeds the appropriate depth and width.
Some things to keep in mind:
Weather: It's best to plant seeds when the forecast is for overcast skies, light winds and slightly cooler temperatures. Hot, sunny days will dry out your soil faster, making it harder for your seeds establish a home in the soil.
Soil: Make sure to loose the dirt below seeds. Cover your seeds with fine soil and press lightly on top to set seeds in place.
Water: Always water your seeds after planting.


Step 8: Water the new seedlings. (I used water from our Sustain Dane rain barrel)

Step 9: Fingers crossed that it grows! :)
Monday, April 12, 2010
Seedlings
Start seedlings indoors
Here are some tips to keep in mind when starting a garden:
Read the seed package or gardening book to find out how early to start your seedlings indoors. Some plants can be sewn directly into the garden.

Label your seedling containers so you know what you planted and when.


Here are some tips to keep in mind when starting a garden:
Read the seed package or gardening book to find out how early to start your seedlings indoors. Some plants can be sewn directly into the garden.

Label your seedling containers so you know what you planted and when.

Place a lid or plastic bag over the containers at first to create keep moisture and heat in.

If planting seedlings in a cardboard or biodegradable container, watch out for mold! If there is too much moisture in your greenhouse environment, you may start to see mold growth on the outside of the container. This could harm or even kill the plant.

Make sure to rotate your plant containers, so seedlings get even amounts of sunlight and they are not growing in one direction toward the light.

Have fun with a variety of plants and containers. Here, I planted cat grass in a boot, so that Charlie can enjoy some grass later this summer.

Sunday, April 11, 2010
My Not-so-Green Thumb
Okay - so the 2010 gardening season has not gotten off to a great start. I tried planting my seedlings in some cardboard, biodegradable cups. It seemed like a good idea at the time. I thought a material that could be planted right into the garden would spare the Earth of yet more plastic containers. Unfortunately, it only took a week before the cardboard cups started to mold and the few seedlings that actually emerged withered and died. So it was back to square one!
I reluctantly reverted back to plastic. This time, I planted Roma tomatoes, jalapeños, banana peppers, yellow, green and red peppers, cayenne peppers and two ornamental peppers. A few days passed and there were no signs of life in the black plastic cups. And just as I was about to declare my garden project a complete failed, it was broccoli that come to the rescue. The little green seedlings look great and I can once again see the faintest glimpse of a green thumb.
I reluctantly reverted back to plastic. This time, I planted Roma tomatoes, jalapeños, banana peppers, yellow, green and red peppers, cayenne peppers and two ornamental peppers. A few days passed and there were no signs of life in the black plastic cups. And just as I was about to declare my garden project a complete failed, it was broccoli that come to the rescue. The little green seedlings look great and I can once again see the faintest glimpse of a green thumb.
Subscribe to:
Posts (Atom)